Guitar Finger Picking Techniques
Click Here for Jamorama - a great way to learn guitar
To get going in learning guitar picking, a good place to start is to practice learning a roll. This is a pattern of notes plucked in a particular order on different strings and looped round and round. In playing the basic roll below, the convention will be the finger to be used will be in brackets with T being thumb, 1 being the index finger through to 4 being the pinkie. This will be followed by the string number with the bottom E string being number 6 going up to number 1, which is the thick E string. So, for example, (T)4 means pluck the fourth string (G) with the thumb.
So the first roll you need to practice is (T)4, (1)5, (2)6
Once you can pluck these notes repeat several times; (T)4, (1)5, (2)6 (T)4, (1)5, (2)6 (T)4, (1)5, (2)6 etc.
Keep practicing this until they all run in together: (T)4, (1)5, (2)6, (T)4, (1)5, (2)6, (T)4, (1)5, (2)6, (T)4, (1)5, (2)6, etc.
To get this to flow into a continuous roll it will take some practice and your fingers will ache! However, once you’ve mastered this basic Chet Atkins style finger picking technique all you have to do is start fretting basic chord patterns with your left hand and already you’re sounding pretty impressive.
Now we’re going to move it up a level. Until now you’ve been guitar finger picking with your thumb, first and second finger, with your fifth finger (pinkie) providing support. We’re going to drop the fourth finger into the mix now with a roll that has just one extra note in but will really make the fingers ache until they become strengthened. Try this one: (T)1, (4)6, (1)4, (3)5
Keep practicing that until you can roll them all together: (T)1, (4)6, (1)4, (3)5 (T)1, (4)6, (1)4, (3)5 (T)1, (4)6, (1)4, (3)5 (T)1, (4)6, (1)4, (3)5
Okay, now we will do some exercise and build up to a tune. If you have not done so already, read the article Guitar Tabs as we will use this notation to tell you what notes to play. In addition, the finger number has been added under the notes.
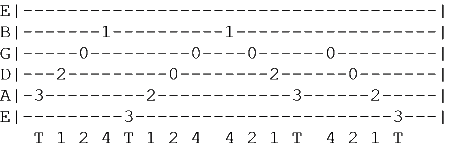
1. Basic Guitar Finger Picking exercise:
2. So, you find that a piece of cake…. This one gets you to pluck two strings at the same time….
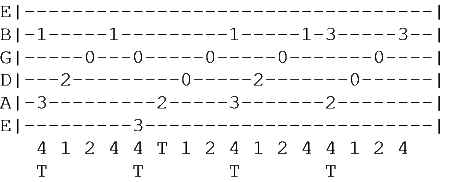
3. Got that? Right.. now we get serious…the beginning of Ode to Joy by Beethoven:
4. Now for the masterpiece… Allgeretto by Fernando Sor… master this and you have
a very good basis for branching out to do other finger picking songs… who knows…you
might even write the next Stairway to Heaven…
|


Learn How To Play The Guitar
Copyright 2010
guitartrainingbuddy.com
Note: The owner of this site is an
affiliate of the products
promoted.
www.guitartrainingbuddy.com